Introduction
Taking proper care of your harmonica is essential not only to preserve its beautiful tone but also to extend its lifespan. Whether you’re a beginner who just purchased your first harmonica or a seasoned player looking to maintain your cherished instrument, this guide will provide you with practical, step-by-step instructions for cleaning and maintaining your harmonica. In this DIY guide, we will explain the importance of regular maintenance, introduce the various components of your harmonica, and offer detailed cleaning techniques that you can easily perform at home. By following these procedures, you can ensure that your harmonica continues to produce clear, vibrant sounds for many years to come.
Regular cleaning and maintenance prevent common issues such as sound degradation, dust and moisture build-up, and mechanical wear. Moreover, taking good care of your instrument is not just about maintaining its functionality—it is also a way of showing respect for the craft and preserving a musical tradition that has brought joy and inspiration to countless players over the years.
Understanding Your Harmonica
Before diving into the cleaning process, it’s important to understand the basic anatomy of your harmonica. Knowing the function of each component will help you perform maintenance safely and effectively.
Anatomy of a Harmonica
The harmonica is a compact and intricately designed instrument composed of several key parts. Each component plays a vital role in producing sound:
- Reed Plates: These are the thin metal plates that house the reeds. The vibration of the reeds when air passes through produces the sound. Over time, dust and moisture can accumulate around these delicate parts.
- Comb: The comb is the central structure that holds the reed plates in place. It can be made from plastic, wood, or metal, and its material affects the instrument’s tonal qualities and maintenance needs.
- Cover Plates: These are the outer panels that protect the internal components of the harmonica. They also contribute to the overall sound by influencing resonance.
- Air Chambers: These are the spaces through which air flows during playing. Maintaining clear air passages is essential for optimal performance.
Material Considerations
The materials used in your harmonica play a significant role in how it should be maintained:
- Plastic Comb: Often found in beginner models, plastic combs are durable and less affected by moisture, but they can discolor over time.
- Wooden Comb: Offers a warmer tone but requires more careful maintenance since wood is susceptible to swelling or cracking due to humidity changes.
- Metal Components: Reed plates and some cover plates are typically metal. While metal is sturdy, it can be prone to corrosion if exposed to excessive moisture.
Common Issues Due to Poor Maintenance
Neglecting the cleaning and upkeep of your harmonica can lead to several problems:
- Sound Degradation: Dust, moisture, and residue build-up can muffle the sound and cause certain notes to become weak or distorted.
- Hygiene Concerns: Since the harmonica comes in direct contact with your mouth, it can harbor bacteria, leading to potential hygiene issues.
- Mechanical Problems: Over time, accumulated debris and moisture can cause parts to loosen or rust, which may result in performance issues or the need for repairs.
Tools and Materials Needed
Having the right tools and materials on hand is crucial for an effective cleaning process. Below is a list of supplies that you should gather before beginning your maintenance routine.
Cleaning Supplies
- Soft Cloths: Use microfiber or other soft, lint-free cloths for wiping down surfaces without scratching them.
- Brushes: A soft toothbrush or specialized cleaning brush works well to remove dust and debris from hard-to-reach areas.
- Mild Detergent or Soap: A gentle soap solution will help clean surfaces without damaging delicate parts.
- Distilled Water: Using distilled water avoids the mineral deposits that can come from tap water.
- Compressed Air (Optional): For blowing out dust from tight spaces; ensure that the air is dry.
Maintenance Tools
- Small Screwdriver: This may be necessary if your harmonica requires partial disassembly for deep cleaning.
- Protective Case: Not for cleaning, but for storing your harmonica safely after maintenance. A padded case will protect it from physical damage and environmental fluctuations.
Step-by-Step Cleaning Process
A systematic approach to cleaning will ensure that you don’t miss any critical areas. In Part 1, we will cover the preliminary steps, inspection, and cleaning of the exterior surfaces of your harmonica.
Preliminary Steps
Before you begin the cleaning process, follow these initial safety and preparation steps:
- Safety First:
- If your harmonica has any electronic components (such as those found in digital or MIDI models), ensure it is unplugged or powered off.
- Choose a clean, well-lit workspace to avoid losing small parts.
- Initial Inspection:
- Examine your harmonica carefully for visible signs of dirt, moisture, or damage.
- Identify any parts that may need special attention or disassembly.
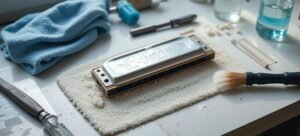
Cleaning the Exterior
The exterior of your harmonica is the first line of defense against dust and grime. Regular wiping and gentle cleaning will help maintain its appearance and functionality.
Wiping Down
- Dry Wipe:
- Begin by using a soft, dry cloth to remove any surface dust. This step is crucial as it prevents the rubbing of particles into the surface when a wet cloth is applied later.
- Damp Wipe:
- Lightly dampen a cloth with a solution of mild detergent and distilled water. Wring the cloth out thoroughly so that it is not overly wet.
- Gently wipe the cover plates and exterior surfaces of the harmonica. Avoid saturating the instrument, as excessive moisture can seep into internal components.
Detailed Cleaning of the Cover Plates
- Cleaning Instructions:
- Focus on the areas around the edges and any visible crevices where dust might accumulate.
- For stubborn spots, you can use a soft toothbrush dipped in the mild detergent solution. Brush gently to avoid scratching the surface.
- Drying:
- After cleaning, use a dry microfiber cloth to remove any remaining moisture from the exterior. It is important to ensure that no water remains on the surface.
Maintaining a Gentle Approach
- Avoid Harsh Chemicals:
- Always use mild cleaning solutions. Harsh chemicals can damage the finish and potentially affect the internal components.
- Regular Routine:
- Incorporate a quick wipe-down after each playing session. This regular maintenance will reduce the need for deep cleaning and help prevent the build-up of residue.
Practical Tips and Best Practices
Adopting a regular cleaning routine and following best practices will go a long way in ensuring your harmonica stays in optimal condition. Here are a few additional tips to help you maintain your instrument effectively:
- Frequency:
- For regular use, a quick exterior wipe after every session is recommended. Deeper cleaning should be done on a monthly basis or whenever you notice a decline in sound quality.
- Environment:
- Store your harmonica in a dry, cool environment. Avoid places with high humidity or extreme temperatures, as these can damage both plastic and wooden components.
- Handling:
- Always handle your harmonica with clean hands to minimize the transfer of oils and residues. Washing your hands before playing is a simple yet effective measure.
- Inspection:
- Periodically inspect your harmonica for any signs of wear, loose parts, or rust. Early detection can prevent more serious issues and extend the life of your instrument.
DIY Guide: Cleaning and Maintaining Your Harmonica for Longevity
Part 2
Cleaning the Interior Components
After thoroughly cleaning the exterior of your harmonica, it’s time to focus on the interior components. This part of the guide will walk you through the safe disassembly (if applicable), cleaning, and reassembly of your harmonica’s inner parts, ensuring that every element of your instrument is well maintained.
Disassembling Your Harmonica
Before beginning the interior cleaning process, determine if your harmonica allows for disassembly. Not all models are designed for easy take-apart, so refer to your manufacturer’s instructions if available. For those harmonicas that can be disassembled, follow these steps:
- Prepare Your Workspace:
- Choose a clean, well-lit, and spacious area. Lay out a soft cloth or a clean towel to work on, which will help prevent small parts from rolling away.
- Have your small screwdriver and any necessary tools within reach.
- Step-by-Step Disassembly:
- Remove the Cover Plates: Gently remove the cover plates by unscrewing any small screws or by carefully prying them off if they are designed to snap into place.
- Separate the Reed Plates: Once the cover plates are removed, the reed plates will be exposed. Take your time to gently lift them out without applying too much pressure, as the reeds are delicate.
- Detach the Comb (If Possible): Some harmonicas have a removable comb. If yours does, carefully slide it out. Note that some models are designed as a single unit, and in these cases, you should not attempt to separate the comb from the reed plates.
- Documenting the Process:
- As you disassemble, consider taking pictures of each step. This documentation will be valuable when you reassemble your harmonica, ensuring that every component is returned to its proper place.
Cleaning the Reed Plates and Comb
Once the harmonica is disassembled, it’s time to clean the interior components. The following steps will help you clean these parts without damaging them:
Cleaning the Reed Plates
- Dust Removal:
- Use a soft brush (such as a clean, unused toothbrush) to gently brush away any dust or debris from the reed plates. Be especially careful around the edges of the reeds where particles may be lodged.
- Washing Procedure:
- If the reed plates are particularly dirty, lightly dampen a cloth with a mixture of distilled water and a few drops of mild detergent. Gently wipe the surfaces, taking care not to bend or damage the delicate reeds.
- Avoid soaking the reed plates, as prolonged exposure to moisture can cause them to rust or lose their tension.
- Rinsing and Drying:
- After cleaning, rinse the reed plates with a small amount of distilled water (if necessary), and immediately dry them with a soft, lint-free cloth.
- Place the reed plates in a warm, dry area to air-dry completely. Ensure they are fully dry before reassembly to prevent moisture-related issues.
Cleaning the Comb
- Surface Cleaning:
- Use a damp cloth with a mild detergent to wipe the comb. For wooden combs, avoid excessive moisture; a slightly damp cloth is sufficient to remove dust.
- Scrubbing:
- If the comb has stubborn residue, a soft brush can be used gently. For plastic combs, this step is usually more straightforward. Wooden combs should be handled delicately.
- Drying:
- Allow the comb to air-dry in a well-ventilated area, away from direct sunlight which may cause warping or cracking in wooden components.
Reassembling Your Harmonica
After ensuring all parts are completely dry, carefully reassemble your harmonica.
- Reinsert the Comb and Reed Plates:
- Begin by placing the comb back into its designated position. Then, align and reinsert the reed plates, ensuring that each reed is correctly positioned.
- Attach the Cover Plates:
- Once the interior components are securely in place, reattach the cover plates. If your harmonica was disassembled using screws, tighten them gently. Avoid overtightening, which can damage the instrument.
- Final Inspection:
- Check that all parts are securely fastened and that there are no gaps or loose components. Perform a quick sound test to ensure that all notes are functioning as expected.
Routine Maintenance Practices
Long-term care of your harmonica goes beyond deep cleaning sessions. Establishing a regular maintenance routine is essential for keeping your instrument in optimal condition and ensuring its longevity.
Daily and Weekly Maintenance
- After Each Use:
- Wipe down the exterior with a dry, soft cloth immediately after playing. This quick clean helps remove moisture and oils from your breath.
- Store the harmonica in its protective case to shield it from dust, humidity, and accidental damage.
- Weekly Routine:
- Give your harmonica a more thorough wipe using a slightly damp cloth with a mild detergent on the exterior. Ensure the instrument is completely dry before storing it.
- For harmonicas that are frequently used, consider a brief inspection to check for any signs of damage or residue build-up around the cover plates and seams.
Monthly and Seasonal Deep Cleaning
- Monthly Check-Up:
- Once a month, perform a more detailed cleaning session similar to Part 1 and Part 2 procedures. This may include a careful inspection of all external components and light cleaning of the interior (if the model permits partial disassembly).
- Seasonal Maintenance:
- As seasons change, the ambient humidity and temperature can affect your harmonica. At the start of a season, especially if transitioning into a more humid or dry period, give your harmonica a comprehensive cleaning and inspect for any signs of wear.
- Consider using a dehumidifier in your storage area during humid seasons or a humidity control pack in your case to maintain consistent conditions.
Storage and Handling Best Practices
Proper storage and handling are crucial in maintaining the longevity of your harmonica. Follow these best practices to protect your instrument:
- Environmental Control:
- Store your harmonica in a cool, dry place. Avoid areas that experience drastic temperature fluctuations or high humidity, as these conditions can damage both plastic and wooden components.
- Protective Case:
- Use a padded, protective case for storage. A well-cushioned case will not only protect your harmonica from physical shocks but also help regulate the environmental conditions around the instrument.
- Handling Precautions:
- Always handle your harmonica with clean hands to prevent oils, dirt, and other contaminants from transferring to the instrument.
- Avoid eating or drinking while playing to minimize residue build-up on the harmonica’s surfaces.
Troubleshooting Common Issues
Even with regular maintenance, harmonica players might occasionally encounter issues that can affect performance. The following troubleshooting tips can help you identify and resolve common problems:
Identifying Problems
- Muffled or Weak Notes:
- This can often be the result of moisture build-up or residue in the air chambers or on the reeds. If certain notes sound weak or distorted, inspect and clean the affected areas.
- Loose Components:
- Check for any parts that may have become loose over time, such as cover plates or screws. A loose component can affect the overall sound and playability of the harmonica.
- Rust or Corrosion:
- Metal components, especially reed plates, can develop rust if exposed to excessive moisture. Regular cleaning and proper drying are critical in preventing corrosion. If you notice rust, you may need to consult a professional for further treatment.
DIY Repairs and When to Seek Professional Help
- Minor Fixes:
- For issues such as loose screws or minor cleaning up of surface rust, you can usually perform simple repairs at home using basic tools.
- Professional Servicing:
- If you encounter more serious problems—such as significant corrosion on the reeds or structural damage—it may be best to take your harmonica to a professional repair service. A skilled technician can address these issues more thoroughly and help restore your instrument’s performance.
- Documentation:
- Keep a log of any recurring issues or repairs. This documentation can be useful in identifying patterns that may require a change in your maintenance routine or prompt more significant repairs.
Advanced Maintenance Techniques
For those who are comfortable with basic cleaning and maintenance, advanced techniques can help keep your harmonica in peak condition and may even enhance its sound quality over time.
Using Compressed Air Safely
- Dust Removal:
- Compressed air can be very effective for removing dust from tight spaces that are difficult to reach with a brush. Use short bursts of air, and make sure the air is dry to avoid introducing moisture.
- Precautions:
- Hold the compressed air can at a safe distance to prevent damage to delicate components. Avoid directing air directly into the reeds for extended periods.
Specialized Cleaning Solutions
- Instrument-Specific Cleaners:
- There are cleaning solutions specifically designed for musical instruments. These products are formulated to clean without damaging the delicate finishes and components of your harmonica.
- Usage Instructions:
- Always follow the manufacturer’s instructions when using specialized cleaners. Test a small area first to ensure there is no adverse reaction.
- Environmental Considerations:
- Choose eco-friendly and non-toxic cleaning solutions when possible. Not only are these better for your instrument, but they are also safer for you and the environment.
Periodic Professional Servicing
- Why Professional Servicing Is Important:
- Even with diligent DIY maintenance, periodic check-ups by a professional can help identify potential issues before they become serious. Professionals have the tools and expertise to perform detailed inspections and repairs.
- When to Seek Help:
- Consider scheduling a professional servicing session at least once a year, especially if you use your harmonica frequently. This routine can help maintain optimal performance and extend the life of your instrument.
Conclusion: Ensuring Longevity Through Regular Maintenance
The harmonica is more than just an instrument—it is a companion on your musical journey. By taking the time to clean and maintain your harmonica properly, you not only preserve its sound quality but also extend its lifespan, ensuring that it continues to inspire you for years to come.
Recap of Key Points
- Interior and Exterior Cleaning:
- We have covered detailed methods for cleaning both the exterior surfaces and the delicate interior components of your harmonica, including disassembly, cleaning, drying, and reassembly.
- Regular Maintenance Practices:
- Establishing a routine of daily, weekly, and seasonal cleaning helps prevent build-up and mechanical issues, keeping your harmonica in optimal playing condition.
- Troubleshooting and Repairs:
- Recognizing common issues such as sound degradation, loose parts, and rust is essential. DIY troubleshooting can resolve many of these problems, but professional help is recommended for more serious issues.
- Advanced Techniques and Professional Servicing:
- For those seeking to take their maintenance to the next level, advanced cleaning techniques and periodic professional servicing can further enhance the longevity and performance of your harmonica.
Final Thoughts
Investing time in the care of your harmonica is a vital part of being a responsible and passionate musician. Through regular cleaning, careful handling, and proactive maintenance, you can ensure that your instrument remains a reliable and expressive companion throughout your musical endeavors. The steps and tips outlined in this guide serve as a comprehensive resource for harmonica owners who want to extend the life of their instrument and enjoy its timeless sound for many years ahead.
Thank you for following along with this DIY guide on cleaning and maintaining your harmonica for longevity. We hope these detailed instructions empower you to take excellent care of your instrument and keep it performing at its best, no matter where your musical journey takes you.